When a large group of items are ordered together, not only do they print within their print groups, but all of the different steaks print together, all of the different fish dishes print together etc.
It basically allows the items that need the most cooking time to be grouped together.
Items with no priority will appear at the bottom of the group of items.
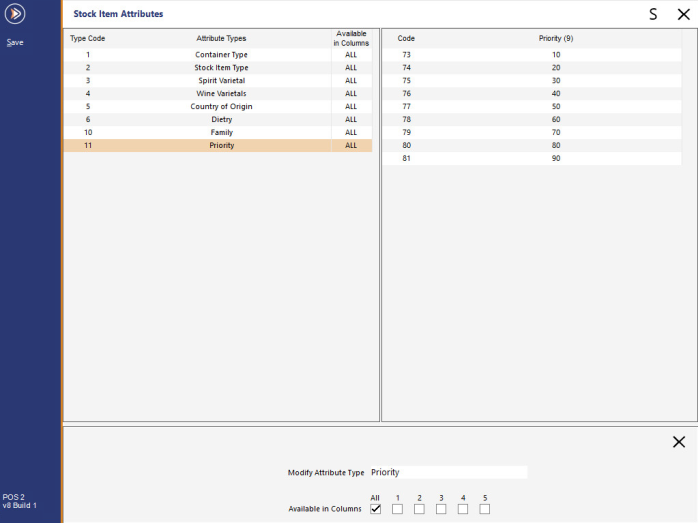
Go to File > Sales > Stock Item Attributes > Add New Attribute Type: Priority > Add New Priority: Enter a range of numbers used to order items > Save.
FIGURE 1-1: The Attribute Type "Priority" appears within the left-hand side column.
The Priority Attributes appear within the right-hand side column.
Enter Stock Items into the sale in any order. In our example, the priority is displayed in the Stock Item Description.
FIGURE 1-2: Items are displayed in the sale window of the POS Screen.
The items will be rearranged to print in the order of priority previously chosen.
Items of the same priority will be printed in the order they were added to the sale.
FIGURE 1-3: The items are ordered on the Kitchen Docket based on their Kitchen Print Priority.
Items within Print Groups will behave the same way.
FIGURE 1-4: The items are displayed in the sale window of the POS Screen.
The items will be arranged into their Print Groups first, and then ordered in their priority.
Items with no priority will appear at the bottom.
FIGURE 1-5: The items are ordered on the Kitchen Docket based on their Print Groups, then ordered by priority.
Instruction items will respect the item they were entered with and print in the correct order.
FIGURE 1-6: The items are displayed in the sale window of the POS Screen with instructions.
Items in the kitchen will print with all instructions located correctly.
FIGURE 1-7: The items are printed on the Kitchen Docket in their Print Groups, ordered by priority with instructions.